In this article, we’ll look at how to read the temperature and humidity of a room using DHT11 sensor and display the results on an LCD.
Introducing the DHT11 Sensor
The DHT11 is a pocket friendly sensor for measuring temperature and humidity. It’s perfect for remote weather stations, home environmental control systems, and farm or garden monitoring systems. It is made of two parts, a capacitive humidity sensor and a thermistor. Inside the sensors exists an Analog to Digital Converter that spits out the signal in digital form. Any micro-controller with a Digital GPIO port can be used to read the digital signal but it requires careful timing to grab the data.The only real downside of this sensor is you can only get new data from it once every 2 seconds, so the sensor readings can be up to 2 seconds old. It uses 3V to 5V for operation and draws a max current of 2.5mA. Humidity reading has an accuracy of ±5% and temperature reading with an accuracy of ±2°C.

The DHT11 uses just one signal wire to transmit data to the Arduino. Power comes from separate 5V and ground wires. A 10K Ohm pull-up resistor is needed between the signal line and 5V line to make sure the signal level stays high by default (see the datasheet for more info).
There are two different versions of the DHT11. One type has four pins, and the other type has three pins and is mounted to a small PCB. The PCB mounted version is nice because it includes a surface mounted 10K Ohm pull up resistor for the signal line.
You’ll need the following to carry out this project
- 1 x DHT11 temperature and humidity sensor, get it here
- 1 x 16×2 LCD, get it here
- 1 x PCF8574AT I2C module, get it here
Step 1: Circuitry
If this is your first time of using your LCD and PCF8574AT I2C module, refer to this article to set it up.
After setting it up and working with it, do not disconnect anything, just add the connection below.

Step 2: Upload the code
- Download the DHT library here
- Install the library in the library folder of your Arduino.
- Upload the code below
#include <dht.h>
#include <Wire.h>
#include <LiquidCrystal_I2C.h>

LiquidCrystal_I2C lcd(0x3F, 16, 2); // set the LCD address to 0x27 for a 16 chars and 2 line display

dht DHT;
#define DHT11_PIN 2

void setup()
{
 lcd.init(); // initialize the lcd

 // Print a message to the LCD.
 lcd.backlight();

 lcd.setCursor(4, 0);
 lcd.print("NERDSHED");

 lcd.setCursor(0, 1);
 lcd.print("nerdshed.com.ng");

 delay(2000);
 lcd.clear();

 lcd.setCursor(0, 0);
 lcd.print("DHT11 TEMP/HUM");

 lcd.setCursor(5, 1);
 lcd.print("SENSOR");

 delay(2000);
 lcd.clear();
}

void loop()
{
 DHT.read11(DHT11_PIN);

 lcd.setCursor(0,0);
 lcd.print("Temp = ");
 lcd.print(DHT.temperature, 1);

 lcd.setCursor(0,1);
 lcd.print("Hum = ");
 lcd.print(DHT.humidity, 1);
 delay(2000);
}
Step 3: Results
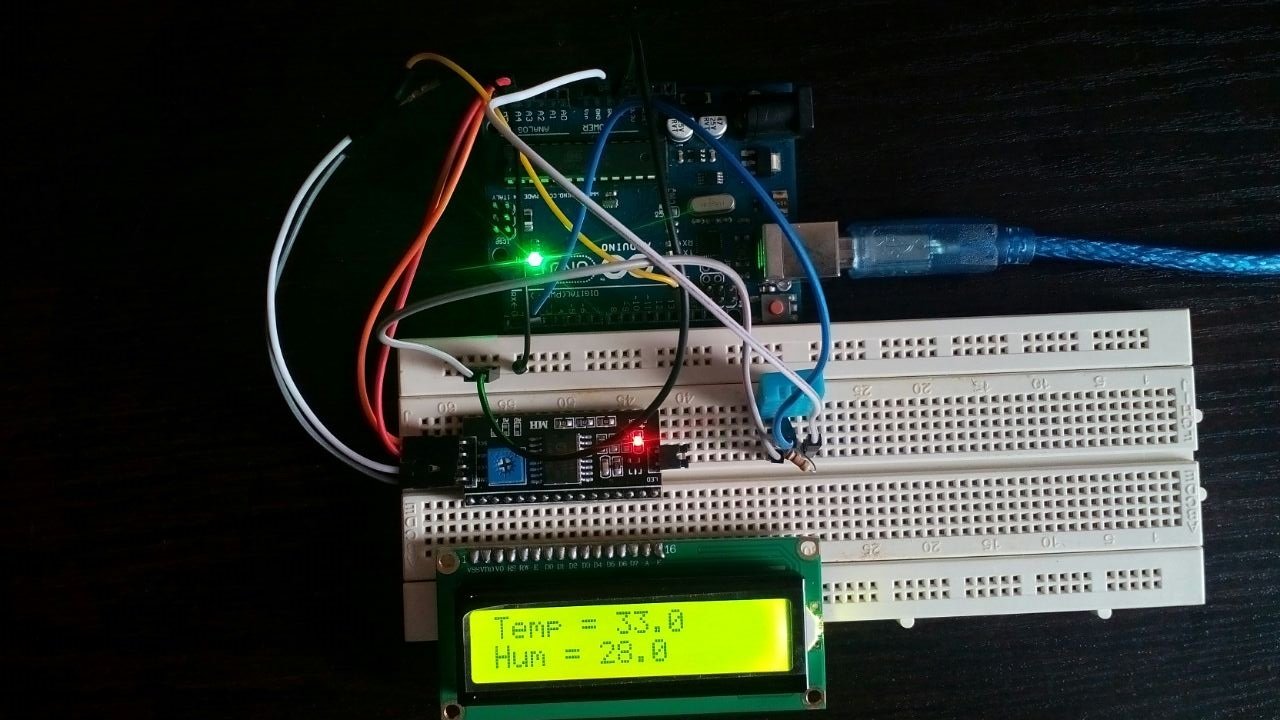
If everything goes well, your result should be similar to the one below


 Power supply


