-

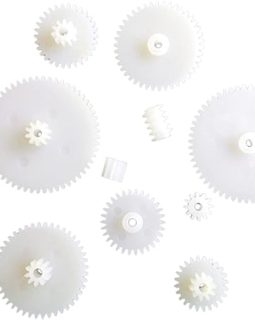
0.5 Plastic Gear Kit – 11 Kinds
₦ 2,250Description:
This is an assorted pack of 11 different commonly used plastic gears
Features:
- Module: 0.5
- Middle aperture diameter: 2mm
- Purpose: DIY scientific small production, product design, mechanical model sample, etc.
- Calculation formula of gear diameter: gear outer diameter (addendum circle) = (number of teeth + 2) * module.
- The above gears are only suitable for 2mm shafts. Including worm, spur gear, spindle gear, crown gear, double reduction gear
Qucik View -

ARM STM32F103C8T6 Development Board
₦ 9,500This board is low cost ARM Microcontroller development board – STM32F103C8T6. The board is suitable for learners and professionals alike who want the 32-bit power of ARM Coretex-M3 32-bit core.
Code for it can be written using MirkroC ARM, Keil MDK, Eclipse GCC, and many more.
Easily load code into the chip via UART (check out our USB-UART converter) //www.konga.com/usb-to-uart-5-pin-cp2102-module-serial-converter-1988801
You DON’T need a programmer, flash using //cdn2.starkled.com/content/uploads/2012/11/Flash_Loader_Demonstrator_v2.5.0_Setup.exe
Features
- On-board Mini USB interface, you can give the board power supply and USB communication.
- On-board test indicator LED
- On-board reset button and power indicator LED
- On-board 100ma 3.3V Regulator
- All GPIO are led out and the names of the pins are marked
- After soldering the headers, you can directly plug the board onto the breadboard
Technical Specifications
- CPU Part Number: STM32F103C8T6
- Core: ARM 32 Cortex-M3 CPU.
- Debug mode: SWD (can be programmed with ST-LINK V2)
- CPU Internal Maximum Clock : 72MHz
- External Clock Source: 8MHz crystal
- 64K flash memory, 20K SRAM
- 2.0-3.6V power, I/O
Programming Instructions
- Set Boot Jumper-0 to 1
- Set Boot Jumper-1 to 0
- Connect USB-TTL Converter’s TX to PA10 on STM Board
- Connect USB-TTL Converter’s RX to PA9 on STM Board
- Give 3.3V power to STM board using USB TTL converter
- Press and release reset button once
- Launch STM Flash Loader, Select Port Name (where your usb ttl converter is connected)
- Select Parity as Even, Baudate as 115200, Echo Disabled and Timeout 10s
- Press Next, and follow on screen instructions to program, erase or read STM microcontroller
Qucik View -
28%

DIY Tank Robot SN3900
₦ 18,000₦ 25,000- Good damping effect, you can press down to 0.7cm.
- With general motors 130, support 3-8V voltage
- With the DC charging port at the bottom of the tail.
- Easy to install.
- Ideal for DIY.
Qucik View
0703-990-6584 || hello@nerdshed.com.ng
